In what can be described as a labor of love, here's our new upholstered ottoman for the
back room! I started this puppy in October 2012 and finally finished it in January 2013. Sure I got side-tracked and a little intimidated during the process, but it's finally done! This tutorial on
Design*Sponge was helpful, but I also figured things out as I went.
Without further ado, hope you're ready for a detailed and photo-heavy post documenting how to build your own upholstered ottoman.
Materials:
3/4 in. plywood/MDF:
2 cuts for the top/bottom - 45" x 19"
2 cuts for the length - 45" x 8.5"
2 cuts for the width - 17.5" x 8.5"
- Wood glue (Liquid Nails)
- 1 1/2" wood/masonry screws
- 2 inch thick foam, cut to 45" x 19"
- Spray adhesive (I just used the wood glue)
- Extra loft batting (I bought batting for a twin-sized quilt (72" x 90") at Joann's and had plenty)
- 5/16" staples
- 2 to 3 yards of fabric, depending on the pattern repeat (I bought ours from Premier Prints)
- Matching thread
- 4 - 2" legs
- Wood stain (I used Mixwax wiping stain/finish in walnut)
- Clean rag or socks
- 4 screw-on leg plates
- Nailhead trim (6 packs of 25 nails)
- Scotchguard
Tools:
- Table saw (unnecessary if your wood is cut at the hardware store)
- Drill and drill bit
- Clamps (optional)
- Serrated bread knife, electric carving knife, or hand saw (if you need to cut the foam to size)
- Scissors
- Staple gun (I bought the Stanley TR250)
- Sewing machine
- Screwdriver
- Measuring tape
- Pencil
- Hammer wrapped with duct tape
- Pliers
Building a Box
Once your wood is cut to size, you'll want to double check that the sides andcorners all match up and are at a right angle. If necessary, sand down any uneven edges.
Once you're satisfied that everything matches up, it's time to screw the sides of the box together (the 45" x 8.5" and 17.5" x 8.5" cuts). Give the edges of the wood a good swipe of Liquid Nails. Clamp the sides of the box together and screw together the sides. Since we don't have large clamps, I held the sides of the box while John screwed them together.
Once the sides are screwed together, apply Liquid Nails to the top of the box. Screw the 45" x 19" piece of wood to the top.
Flip this over and repeat with the 45" x 19" piece of wood for the bottom.
You should be left with a box that looks something like this. I let the box "set" for a few days before starting on the upholstery.
Upholstering the Box
First, we tackled the foam. Joann's was able to cut the 2" foam to my required length (45"), but I needed to trim it to the proper width (19").
I used a small handsaw for the task. Joann's used an electric carving knife (what you would use for a Thanksgiving turkey), but a serrated bread knife would also work.
Spray the top of the box with the adhesive (or use the Liquid Nails). Really cover the surface!
Press the foam into the glue/adhesive. I let things set for a day or so again.
Once the glue is set, it's time for the batting. You could mark our your measurements on the batting and cut. Since I had such a large piece of batting, I simply draped it over the box and started cutting it to size.
Snip, snip, snip.
I draped the batting over the box in the opposite direction and cut it again. The pieces of batting overlap on the top.
And now for my upholstery weapon of choice: the staple gun.
This one was around $20. I picked it because it's versatile (we can use staples or brads) and "features an easy-to-squeeze trigger and comfortable handle to reduce hand fatigue." This is the first time I used a staple gun, so can't really compare it to anything else. Overall, it seems like a good pick.
Flip the box over so the foam is on the floor. Pull the batting evenly over the sides of the box and staple every few inches. Be sure to avoid stapling on the screws.
Like so!
This is how things looked from the bottom. You'll see in future pictures that we trimmed around the corners where the screw-on leg plates were installed.
This is how the upholstered box looked once flipped foam-side up.
A close-up of a corner. The part hanging out at the bottom was eventually tucked under or trimmed.
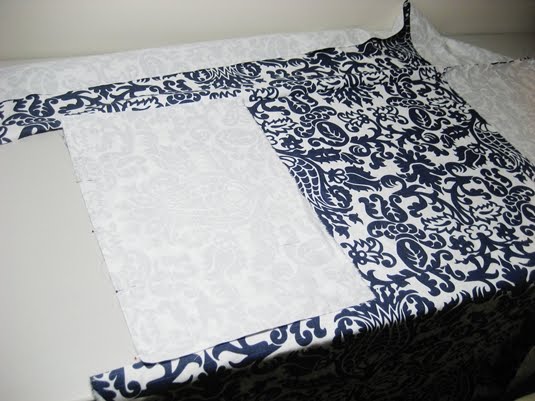
Probably the hardest part of this whole project was picking the fabric and lining up the pattern. I bought 2 yards of fabric, but life would have been so much easier if I had purchased 3 yards. The pattern repeat made things a little tight and the pattern didn't line up perfectly. Close, but not perfect.
In essence, I made a slipcover that I then stapled to the padded box. Take the dimensions of the upholstered box (45" x 19" x 12") and add a few inches along each side for the seam allowance and for when you staple the fabric to the box. I also recommend working on one side at a time, checking the fit of your "slipcover" as you go.
First, I cut the fabric for the top ~46" x 20". This allows for a 1/2" seam allowance on each side. Then I cut 2 pieces of fabric for the length ~46" x 15". This takes into account a 1/2" seam allowance on the long side and the 1/2" seam allowance and room to staple the fabric on the short side. Sew one of the "length" pieces to the "top" piece.
I then cut the two side pieces ~20" x 15". This accounts for both a 1/2" seam allowance on the long side and 1/2" seam allowance and staple room on the short side. Sew one of the "side" pieces to the "top" piece. Then sew the "side" piece to the "length" piece. You've now created one of the corners of the "slipcover."
Continue to work your way around the slipcover. Sewing the "length" to the "top" and then sewing a corner.
Sew the final "side" to the "top" and then sew the corners.
Don't forget to check the fit of your "slipcover" as you go. You want to make sure it's nice and snug on the padded box.
Once you're satisfied with your fit (and yes, I had to rip a few seams and start over), it's time to staple again! With the "slipcover" on, flip the box over so it's foam-side down.
Pull the fabric tightly and evenly and start stapling to the bottom of the box. I held the fabric tight while John stapled. We started from the center of the fabric and worked our way out. We also alternated the sides that we stapled to make sure the fabric was pulled evently.
Fold over the fabric at the corners and staple. Be sure to avoid the screws and any staples used to attach the batting.
The Legs
We picked up four unfinished wood legs from the Home Depot. Right near the legs were these screw-on leg plates (they came with screws). We simply screwed the plates onto the bottom of our ottoman and the legs screw into the plate.
As we were screwing on the plates, we noticed that the batting was getting in the way. Therefore, we trimmed it where the plates would be installed. We also made sure to space the plates evenly from the edge of the corners.
Yes, we ultimately chose a different set of legs. The first set we bought were 6" long, which made the ottoman a little too tall. But this picture shows how the leg and plate set-up works.
These are the legs we decided on. 2" high and unfinished. We picked up the Minwax water based wipe-on stain in walnut.
It was easy to apply with a clean and soon-to-be-retired sock.
Simply squirt a little stain on the leg and wipe on. Wipe off any excess.
This is how things were looking after one coat.
We let the legs dry for the requisite hour and then wiped on a second coat. We let the legs dry for another day or so before screwing them onto the ottoman.
The Nailhead Trim
I could have stopped once we added the stained legs, but I thought the ottoman needed a little finishing trim. Therefore, I picked up some bronze nailhead trim from Ace Hardware.
I used our small tap hammer and the guy at Ace suggested taping the end with duct tape. That padded the hammer and prevented scratches on the nailhead. The pliers and wrench were on hand to pull out any nails that didn't cooperate.
I marked a spot every inch with a pencil. The distance from the edge of the ottoman to the nailhead was simply the width of my tape measure (so about an inch).
The Finished Ottoman!
Here's our upholstered ottoman in all of its shining glory!
Of course, my feet are resting on the ottoman as I finish up this post. I still have to spray the fabric with Scotchguard, so hopefully I can take care of that over the next few days.
And yes, watching
cable TV hasn't been the same now that we have somewhere to kick up our feet :)
Pin It


Wow, that ottoman is gorgeous!!!
ReplyDeleteWow, well done!
ReplyDeleteLooks gorgeous!!!!!
ReplyDeleteLooks great. Love the nailhead detail.
ReplyDeleteLooks great and I'll have to remember the duck tape on the hammer suggestion!
ReplyDelete