Showing posts with label DIY. Show all posts

Wednesday, June 25, 2014

Toolbox Essentials for the New Homeowner


It's summertime, which means DIY projects and household improvements are filling people's weekend "to do" lists. The summer is also a prime time to buy a new house, which means you need to be prepared for repairs. If you're in either of these camps, you'll enjoy today's post sponsored by Gotstock.

What’s in Your Toolbox?
Whether you live in an apartment, condo, or house, you should have a few basic tools on hand to tackle simple household repairs. This isn’t about being an HGTV DIY expert; it’s just about being reasonably self-sufficient.

Think about whether you would be able to deal with an emergency. If you don’t have to the tools to do this; you need to make a trip to the hardware store. This applies to both the ladies and gentlemen. 

What is the Best way to Acquire Tools?
There are ready-equipped tool kits on the market which give you access to a variety of different sizes and types of tools. The problem is that the majority are not cheap, and you may not need all of the items in the kit.

The best time to buy the very basic tools is when you first start running your own home. Then as you go on, you can acquire, rent, or borrow extra materials as jobs require them. So what are the essentials?

Screwdrivers
These tools are probably the most essential of the essentials. Whether it’s changing an outlet or putting together furniture; a screwdriver always comes in handy. It's useful to have a selection of screwdrivers for different sizes and types of screws (i.e. flathead vs. Phillips head). A really small screwdriver is also helpful to tighten a loose screw on a pair of glasses or sunglasses; check out Gotstock for more on this.

Claw Hammer
You don’t have to spend a lot of money on a hammer, you just need one that will do the job. This is pretty essential for a lot of basic household DIY tasks such as hanging a picture frame. A claw hammer also allows you to remove nails to take down furnishings in your home.

Wrench Set
Again, you don’t have to spend a huge amount of money on wrenches, but make sure that they can withstand a fair amount of pressure. You don’t want to leave a bolt unscathed and bend the wrench instead.

Cordless Drill
If you're going to put shelves or curtain rods up, you're going to need a few holes and anchors in the wall. A cordless drill is the best way of doing this. Being cordless reduces the risk of tripping, but you still have to be really careful that you use it correctly.

Plunger
You hope you never have to do it, but unblocking a toilet is easy with a plunger. Tie a plastic bag tightly over the end and plunge with vigor; the toilet will be unblocked in no time.

Ladder
Yes, it is a bit big to fit in a toolbox, but it is an essential item for completing a lot of jobs in the home. Something as simple as putting a shade on a light, is a lot easier and safer when done off a stable ladder instead of a chair.

Miscellaneous
Other helpful tools include a measuring tape, level, box cutter, pliers, and safety glasses.

Be Careful with Storage
Storing tools safely is common sense, but sometimes people are in a hurry and items get left around the home. If this happens, a child might pick up a tool and do damage to the house, or worse to themselves. Ladders are also very important to be aware of. Never store them where there is a significant chance that they can be knocked and toppled over.

A tool box or tool chest is ideal for storing tools, but at the very least, you need to make sure that they are protected and dry. This will ensure that you have a useful set of tools to use for many years.
Pin It

Friday, May 30, 2014

Hiding a Cable Box and DVD Player

Hello and happy weekend! Do you have anything planned for these next few days? Lately, our weekends have been a mix of relaxing, half marathon training (my recent 9-miler was a beast), and house projects. Last weekend, I finally converted our "new" buffet into a media center.


In keeping with our "theme" of hiding TV cords in our back room, thus making things a little more baby-friendly, I wanted to tuck our cable box and DVD player out of sight. At first, I thought about putting the cable box and DVD player in a drawer and adding a hinge to the drawer front so that it would drop down when we wanted to watch TV. After talking with Meg, she suggested drilling holes in the back of the buffet and buying an Infrared Receiver Extender Cable. The cable plugs into the cable box or DVD player (out of sight) and the receiver is mounted to the front of the TV or somewhere else in sight of your remote control.

Unfortunately, that model was incompatible with our U-verse HD cable box (a Cisco ISB 7005). Fortunately, one of the Q&A commenters on Amazon suggested a model by Nextronics. I ultimately purchased the Nextronics IR Infrared Remote Extender Repeater (Dual). I liked this model because we could control the cable box and DVD player with one infrared receiver.

This whole project, not including the cost of the buffet, costless than $30. About $21 for the infrared extender and about $6 for a Bosch 1-1/2-inch spade bit from Home Depot.


I ultimately decided to put the cable box and DVD player in one of the side cabinets. There's a little more room for the DVD player to open and I only had to drill through one layer of wood. Based on Young House Love's similar project, I marked off 4 holes (3 inches apart) for the wires and ventilation.


After donning a pair of safety glasses (trust me, wood was flying!), I made quick work of drilling the holes.


Once the holes are sanded, you can hook everything back up. The HDMI cables were already connected to the TV and tucked behind the wall thanks to the Wallblade (see how we installed it here).


The infrared extender cable uses the USB port on the TV as its power source. Once connected to the TV, I fed the wire with the two mini transmitters through the Wallblade and through the holes in the back of the buffet. I then stuck the mini transmitters on the translucent or infrared window on the front of the cable box and DVD player. Finally, I mounted the large receiver to the front of the TV.


So far, everything is working well. The large receiver has a light that turns green when turned on and will flash red when it receives a signal from your remote control. Just be sure to point the remote at the receiver.


Pin It

Tuesday, October 29, 2013

DIY Baby Dinosaur Costume

Halloween is only a few days away! Are you ready? I finally pulled together Monica's costume over the weekend. We went to Target a few weeks ago and were less than impressed at the costume selection for babies. So we picked up the pumpkin onesie she wore to the pumpkin patch and called it a day. The onesie also came with a pumpkin hat, so we figured she would be a pumpkin for Halloween.

Turns out, the pumpkin hat was a tad small (girlfriend has lots of hair!), so it wasn't looking like she was going to be a pumpkin. After brainstorming and creating a quick costume for my work party (thanks to this tutorial), I knew it would be easy enough to whip up Monica's costume.

I present to you, our little Cute-a-saurus!


See also: a DIY baby dinosaur costume that can be made in less than an hour for only a few bucks. If you're still searching for a costume for your little one, grab your sewing machine and get crafting!


Materials
  • Hooded sweatshirt (one with a zipper is easier to sew)
  • Two sheets of felt (mine were 9"x12")
  • Thread
  • Fabric glue
    • Note: Not all fabric glues are created equal. Test yours out on a piece of scraft felt first. I tried two kinds of fabric glue (Liquid Stitch and Sew No More) and both drenched the felt. I finally had success with Martha Stewart's glittering glue. The original tutorial said that Aleene's no-sew fabric glue worked well for her.
 
Tools
  • Rotary cutter and cutting mat (or scissors)
  • Iron and ironing board
  • Sewing machine
  • Pins
 
 
Cut the felt rectangles in half, widthwise.

 
You'll now have four 6"x9" felt rectangles.

 
Fold the felt rectangles in half lengthwise and iron the crease.

 
It's now time to mark where the spikes will be cut from the felt. I was able to get three spikes from each of the felt rectangles. Along the creased side of the felt, put a mark at 3" and 6". Along the open side of the felt, put a mark at 1.5", 4.5", and 7.5". You can trace a line to connect the marks if you like. Repeat for the other felt rectangles.

 
Cut out your spikes.

 
For a newborn-sized sweatshirt, I only needed 7 spikes. Two 9"x12" sheets of felt yielded 12 spikes, so use as many as you need for larger sweatshirts.  

 
Unfold the spikes and pin them down the center of the hoodie, making sure the crease is in the center. Start with the hood (there's usually a seam going down the center) and work your way down.

 
Sew the spikes onto the hoodie, following the creases as your guide.

 
Looking cute!

 
Apply fabric glue to the spikes, fold together, and let dry overnight. This gives the spikes a little more substance. Or if you don't have time to glue the spikes, you can just tape and fold them together.

 
Rarrrr!

Pin It

Wednesday, October 2, 2013

An Easy Duvet Cover Update

 
It's been a little while since I shared a DIY project, no? Let's remedy that with an easy update to a duvet cover or comforter. Truth be told, I first completed this project over four years ago. The ribbons were starting to fall off, so I decided to clean things up a little and share this project with you!
 
 
Materials
  • Duvet cover or comforter (I bought this light-weight comforter at Target over four years ago)
  • Ribbon, cut to the length and width (plus a few inches) of your duvet cover or comforter
  • Ultrahold HeatnBond, slightly thinner than the width of your ribbon
 
Tools
  • Iron and ironing board
  • Scissors
  • Measuring tape

Before starting, be sure to pre-wash, dry, and iron your duvet cover or comforter.

Next, one of the most important steps of this entire project is to measure the length and width your duvet cover or comforter. I'd do it twice just to be sure. This determines how much ribbon and HeatnBond you need.

One you have your measurements, add a few inches. One, because you'll be folding under the ends of the ribbon for a finished look. And two, because the duvet cover or comforter might stretch out a little while ironing on the ribbon.

 
Pre-heat your iron to medium heat (wool) setting without steam.
 
Fold the starting end of the ribbon under 1/2 inch. Place the HeatnBond adhesive-side down/paper side up on the back of your ribbon. Lightly press and hold the iron on the paper side of the adhesive for 2 seconds. Move down the ribbon and repeat until the entire length is bonded.

Go back to the starting end of the ribbon. There will be a loop where you folded under the end of the ribbon. Cut a small piece of the HeatnBond, remove the paper backing, and slide the tiny piece of adhesive into the loop. Lighly press and hold the iron on that section for 2 seconds.

 
Once the HeatnBond-ed ribbon is cool, peel off the paper backing.
 
 
Measure where you will iron the ribbon onto your duvet cover or comforter (i.e. 6 inches from the edge, 3 inches from a second ribbon, etc.). You can pin down the ribbon or recheck the measurements as you iron.


With the adhesive-side of the ribbon down on the comforter or duvet cover, press and hold the iron for 8 to 10 seconds on each section of the ribbon until the entire length of the ribbon is bonded to the duvet cover or comforter. Be sure to start with the looped end of the ribbon.

 
If you want to do a basket weave pattern, be sure to iron down the appropriate pieces of ribbon first, then overlap as necessary.

 
Once you get to the other end of the duvet cover or comforter, loop under the end of the ribbon 1/2 inch. You'll need to cut another small section of the Heatnbond. Peel off the paper backing and place the adhesive between the ribbon and duvet cover or comforter. Press and hold the iron for 8 to 10 seconds

 
Continue ironing your ribbons until your pattern is complete!


This is a great project to customize a plain duvet cover or comforter. You could also use this same technique to embellish simple curtains or basic pillow covers.


Pin It

Thursday, June 27, 2013

Sewing an Adjustable Crib Skirt

Hi, friends! I hope you enjoyed the summery guest posts during these past few weeks. And a big thank you to everyone who filled in for me. Blog posts (and showers) will be here and there while we adjust to life with a newborn.


Speaking of our newborn, I was convinced she would come early. Of course she decided (with a  little help) to arrive a week late. While I was working from home during the last 3 weeks of my pregnancy, I also filled my idle time with a few projects to keep my mind off of the fact that she.wasn't.here. One project was sewing an adjustable crib skirt on her due date.
 

A crib skirt isn't necessary to bring a baby home from a hospital, but I had some free time. Plus, I didn't want to see everything stored in the drawer underneath her crib. That's the whole point of the drawer, right? After a little searching, I found a tutorial for an adjustable crib skirt since we'll eventually move the mattress down. The instructions are a little sparse, I figured I'd elaborate on them.
 
  
Materials:
  • One yard of fabric
  • Matching thread
  • Ribbon, cut in 14 inch long strips
Tools: 
  • Iron and ironing board
  • Measuring tape
  • Rotary cutter or scissors
  • Cutting mat and ruler, if using a rotary cutter
  • Sewing machine


Before starting, be sure to pre-wash, dry, and iron your fabric.

Measure your crib and the area you'd like to conceal with the crib skirt. With the mattress at the highest setting, my finished crib skirt needed to be 51.5 in. long, 24.5 in. wide, and 12 in. tall.

Add 2 inches to each of these measurements for the seam allowance.

Since the long side of the crib will be facing the wall, I only cut 3 panels:
  • Two small ones for the side that are 26.5 in. long x 14 in. tall
  • One large one for the front that is 53.5 in. long x 14 in. high
 

Fold in the corners, making a right triangle with 2 inch legs. Iron the fold.


Starting with one side of your panel, fold and iron the edge in 1/2 inch.


Fold and iron the other 3 sides in 1/2 inch.


Repeat by folding and ironing the four sides in 1/2 inch. The cut edges of your panel will now be concealed.


Since my fabric is slightly see-through, I snipped the exposed corner of the corner triangles. If you have solid, dark-colored fabric, this step is probably unnecessary.


Post-corner triangle snipping. It also looks more finished to me.


Measure where you'd like to tie your ribbons to the crib.


Pin the ribbons to the top edge of your crib skirt panel. Mine are sewn at approximately 10 inch intervals.


Hem the sides of each panel, being sure to sew through the pinned ribbons.


Once you've hemmed all of the crib skirt panels, tie the panels to the crib mattress support frame.


As you need to raise or lower the crib mattress, you can tie the ribbons longer or shorter to adjust the length of the exposed crib skirt.


Pin It

Wednesday, May 8, 2013

Nursery Update: Pom Poms and Lanterns

 
Last week I tweeted and shared on Instagram that the nursery is still in process. A few parents responded that their nurseries are still in process (even after a year!) or that their nursery wasn't quite ready when the baby arrived. While this made me feel a little better, I still wanted to make some progress beyond the crib and dresser. Last weekend's party and a Pinterest Challenge were just the motivation I needed!
 
Top: Nursery from My Life in Transition
Left: Tissue paper pom mobile from PomLove on Etsy
Right: Nursery from Under the Sycamore
 
After a flurry of pinning, I decided that the nursery needed some fluffing. Mainly some pom poms and lanterns above the crib a la Julia of My Life in Transition. Her daughter's nursery is perfectly girly, but not too over the top. And let's not forget this lovely collection of fluff above Ashley Ann's DIY pallet day bed.


I had everything I needed from prior craft projects or in my gift wrapping stash. That stack of tissue paper is just from baby showers!

 
Materials
Note: This is for one pom pom. Scale up the quantity of materials as needed.
 
  • 4 to 6 sheets of tissue paper. (Mine were about 20 x 26 inches)
  • Floral stem wire (20- or 24-gauge)
  • Scissors
  • Hooks for hanging the poms
  • Fishing line or string to hang the poms
 
Fold your sheets of tissue paper in half (like a hot dog) and cut them in half. This will leave you with a stack of 8 to 12 sheets of tissue paper (~10 x 26 inches).
 
 
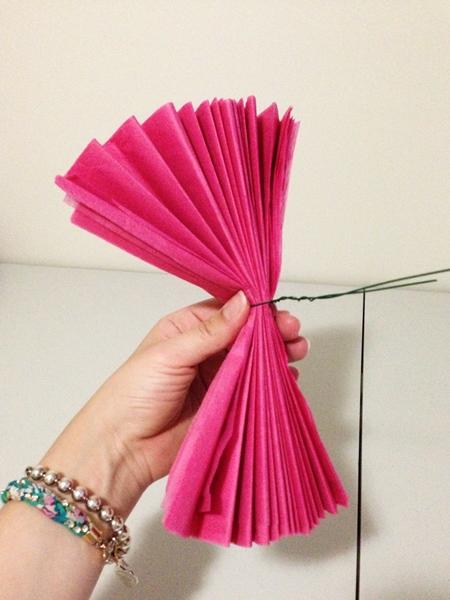
Make 1 to 1 1/2-inchwide accordion folds, depending on how dense or fluffy you want your pom to be. Mine were probably closer to 1 inch folds. Be sure to crease after each fold.
 
 
Pinch the folded stack of tissue paper in the middle.

 
Wrap the floral wire around the middle of the stack of tissue paper, making sure to twist the wire around itself.

 
Trim the ends of the tissue paper into pointy or rounded shapes.

 
Separate and fluff the layers one at a time. (See also Step 3's photo from Martha Stewart's tutorial.) I alternated which side I pulled away from the center so that my pom pom was evenly fluffed.

 
Give your pom pom a once over and proper fluffing.
 
At this point, I trimmed the floral wire down a bit and bent it into a loop. Cut the fishing line or thread to your desired length and loop around the wire loop.
 
 
In addition to the DIY poms, I picked up a package of pink accordion lanterns from Michaels. They were about $10 after a 40% off coupon and super easy to unfold. String is not included in the package, so you'll need to cut additional fishing line or thread to your desired length and loop it around the wire loop at the top of the lantern.

 
We used these hooks from a picture hanging kit to hang our poms and lanterns. You could also pick up some J-hooks from the hardware store. Since the lanterns and poms are extremely light, we didn't bother with anchors.

 
John found that hammering the hook halfway into the ceiling and then screwing it in was the most effective. He then tied the fishing line, which was already looped around the pom or lantern, to the hook. We just eye-balled the placement of the poms and lanterns, making sure to vary the sizes, colors, and heights.


I still need to pick out artwork and some shelves for the nursery, but at least things are moving along!
Pin It
Related Posts Plugin for WordPress, Blogger...