Showing posts with label fall. Show all posts

Tuesday, November 26, 2013

Thanksgiving Turkey Burger with Cranberry Aioli

 
Hi, friends! I've been waiting to share this recipe with you since the summer. John enjoyed the "Thankful" burger at Grange Hall Burger Bar in July and we recreated it a weekend or so later. While the burger was tasty enough to share then, the flavors are a little more appropriate for this week of Thanksgiving.
 
 
Speaking of Thanksgiving, I'm extremely thankful for my family this year. Yes, being a parent is hard work, but Monica's smiles, giggles, and overall happiness makes it worth it. I'm also thankful for John and his cooking skills. I often joke that he feeds me (and himself) and I feed Monica, so things are even in the kitchen.
 
 
Back to the kitchen...if you'd rather use this burger as a way to give leftovers a new life, have at it! You could easily use a few slices of roasted turkey in place of ground turkey. If you go that route, I would suggest adding some fresh sage leaves to your sandwich.
 

As for the cranberry aioli, it was super easy to make using the food processor. And I felt very Julia Child in the process.

 
If you're not feeling that brave (yes, there is a raw egg yolk in there), you can take some leftover cranberry sauce and mix it with mayonnaise and a little minced garlic.
 

Top your burger (or leftover turkey sandwich) with some muenster cheese, arugula, a healthy slathering of cranberry aoili, and serve it on a pretzel bun. If you are going the leftover turkey sandwich route, I highly recommend melting the cheese under the broiler. 


Thanksgiving Turkey Burger with Cranberry Aioli
Inspired by Grange Hall Burger Bar
Yields 6 burgers

Ingredients

For the burgers:
2 pounds ground turkey
1/2 medium sweet onion, minced
~12 sage leaves, rough chopped
Salt and pepper

For the cranberry aioli:
2 cloves garlic
1/2 tsp salt
1 egg yolk
1 cup olive oil
1 cup fresh cranberries*, roughly chopped
1 T sugar

6 slices muenster cheese
Arugula
6 pretzel buns

Preparation
In a large mixing bowl, stir together the ground turkey, onion, sage, salt, and pepper. Divide the ground turkey mixture into six patties.

Pulse the garlic, salt, and egg yolk in the food processor or blender.

Slowly pour the olive oil into the food processor or blender on "stir." As the aioli thickens, keep pouring in the olive oil until it's all incorporated. Taste and add more garlic or salt, as necessary.

Add the cranberries and sugar to the aioli and pulse a few times in the food processor or blender. Taste again.

Grill your burgers to desired doneness, adding the cheese at the very end to melt.

Serve on pretzel buns with arugula and cranberry aioli.

*I used fresh cranberries that were previously frozen. Roughly chop, add sugar, and microwave in a bowl for about 15 seconds to thaw.
Pin It

Wednesday, October 23, 2013

Why We Spent $9 on a Pumpkin

Hi, friends! Long time, no chat. What's new with you? This past (extended) weekend, I was in St. Louis at FINCON13 to brush up on my financial blogging skills. Before heading back to Chicago, we took a quick trip to Eckert's to go pumpkin picking.  

Lately, I've seen a bunch of blog posts sharing ways to save money on fall activites. One tip was to skip the pumpkin patch and just buy a pumpkin at the grocery store. Ignoring the "expert" advice, we happily drove to the pumpkin patch and gladly parted with our $9. 


Isn't this the most beautiful pumpkin you've ever seen? I won't be offended if you don't think so because...

IT'S NOT ABOUT THE PUMPKIN!

Sure, we could save a few bucks by buying our pumpkin at the grocery store, but going to a pumpkin patch is about the experience and creating new memories. Memories for me as a new parent and new memories for Monica: driving to the farm in the country, riding the wagon, and choosing our pumpkin in the middle of a field.


And then changing Monica's diaper in the middle of said field and discussing life insurance on the wagon ride back.

Going to the pumpkin patch also included feasting on a giant turkey leg, corn dog, and kettle corn. We don't eat those things on a regular basis, so they're a treat. Plus, giant turkey legs remind me of our trip to the Illinois State Fair when we were still dating and corn dogs remind me of going to Cedar Point with my family.

And know what? Those memories are priceless.
Pin It

Friday, October 11, 2013

Cinnamon Sugar Buttermilk Donuts


I don't know how it is for the other new mamas out there, but I've had more cravings after Monica was born than while pregnant with her. My cravings of choice include ice cream, milkshakes, donuts, cookies, and a myriad of other sweets. I chalk it up to breastfeeding and running.


A few weeks back, I decided to indulge in my donut craving. The weather was starting to turn fall-ish and I associate fall with cinnamon and baking. OK, I fried the donuts, but you get my point.

The great thing about these donuts is that I already had everything I needed on hand. The original recipe called for sour cream and buttermilk, but there are easy substitutions for those. We usually have yogurt in the fridge, so I swapped out the sour cream for Chobani honey ginger Greek yogurt. And you can "make" buttermilk by adding 1 tablespoon of lemon juice or vinegar to 1 cup of milk and letting sit until it curdles, about 10 minutes.


As for special tools, you really only need a candy thermometer since it's important to keep the oil between 165 - 170*. Nobody wants a burnt donut! I used a plastic cup and old spice jar to cut out the donuts and donut holes.


A bench scraper is helpful, but you can also use a spatula to lift the donuts off your counter. And a slotted spoon, as opposed to a spider strainer/skimmer, can be used to take the donuts out of the hot oil. 


Since I didn't want to indulge too much, I only made half of the original recipe, which was plenty for John and I. The ingredients and measurements below are for the half batch and yielded about 6 big donuts and at least a dozen donut holes.
 
 
While these donuts are delicious dipped in cinnamon sugar, they're also pretty fantastic on their own because cinnamon and nutmeg is in the donut itself.


Cinnamon Sugar Buttermilk Donuts
Adapted from Baked Explorations: Classic American Desserts Reinvented

Note: This recipe is for a half batch, which makes about 6 large donuts and a dozen-ish donut holes

Ingredients

For the Donuts:
1 3/4 cups all-purpose flour
3/8 cup (or 6 tablespoons) granulated sugar
1/4 teaspoon baking soda
1 teaspoon baking powder
1/2 teaspoon salt
1/2 teaspoon ground nutmeg (I made this a heaping 1/2 teaspoon)
1/2 teaspoon ground cinnamon (I made this a heaping 1/2 teaspoon)
1 large egg
3/8 cup buttermilk (or 1 1/8 teaspoon lemon juice and 3/8 cup milk, mixed together and let sit until curdled)
2 tablespoons reduced fat sour cream or yogurt
2 tablespoons unsalted butter, melted and cooled
Vegetable oil for frying

For the Cinnamon Sugar:
5/8 cup granulated sugar
1 1/2 tablespoons cinnamon

Preparation
Line one baking sheet with parchment paper and another with paper towels.

In a large bowl, whisk together the flour, sugar, baking soda, baking powder, salt, nutmeg, and cinnamon.

In another bowl, whisk the egg, buttermilk, and sour cream/yogurt until combined. Add the melted butter and whisk again. The butter might harden once it hits the cold buttermilk mixture, so be sure to whisk the mixture well.

Make a well in the center of the flour mixture and pour the egg mixture into the center. Gently fold the flour into the liquid until the mixture forms a sticky dough.

Turn the dough onto a lightly floured work surface and sprinkle the top of the dough with flour. Pat the dough out until it is about 1/2 inch thick.

Use two round cutters (2 1/2 inch and 1 inch). Dip the larger cutter in flour and cut out the donuts. Dip the smaller cutter in flour and cut the donut holes. Arrange the donuts and donut holes onto the parchment paper lined baking sheet. Continue to pat together the remaining scraps and repeat cutting as many donuts as possible ( I got about 6 big donuts and a dozen donut holes). Chill the dough while you heat the oil.

Pour oil into a deep skillet or dutch oven until it is about 1 – 1 1/2 inch deep. Slowly heat the oil over medium-high heat until it reaches 165-170 degrees.

Mix the cinnamon sugar while the oil heats.

To Fry the Doughnuts
Once the oil reaches the appropriate temperature, gently place the doughnuts into the hot oil. Be sure to only fry about three at time so you don’t over crowd the pot.

Be careful to keep the oil temperature even. Adjust the burner to keep temperature between 165-170 degrees!

Once they have browned on one side, carefully flip them over in the oil. These should take about 2-3 minutes per side. Using a slotted spoon or spider strainer, transfer the donuts to the paper towel lined baking sheet.

Continue with the rest of the donuts and the donut holes. The donut holes will take less time, about 1 minute per side.

Assemble Doughnuts
Once you have finished frying the doughnuts, quickly dip them in the cinnamon sugar. Or just enjoy them au naturel!
Pin It

Monday, September 23, 2013

Fall Favorites

Blazer, Boots, Tee, Jeans, Scarf, Satchel

Hey there, Fall. Fancy seeing you around these parts. I wouldn't say that you're my #1 season, but I do appreciate your cohorts: blazers, scarves, boots, and pumpkin ale/spice latte/baked goods/etc. We'll also have to fit in a little apple picking and apple baking soon.

It may have been in the 60's yesterday, but that didn't stop me from donning my navy blazer, boots, and a scarf. And while we're at it, can we discuss this scarf? Is it too early to put things on my Christmas list because I'm mildly obsessed. This lovely would go with everything!

Hope you have a fantastic start to your week!

PS - I just added a hovering "pin it" button thanks to {av}'s quick and easy tutorial!
Pin It

Monday, November 19, 2012

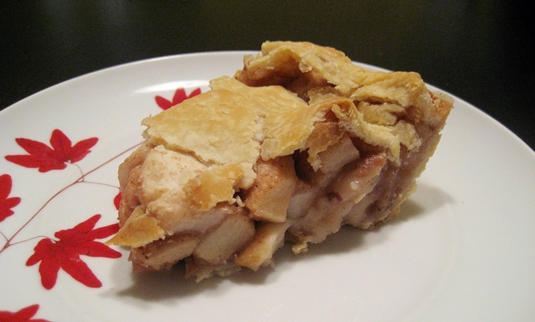
Mom's Apple Pie


Thanksgiving is this week and I can't wait for all the homemade goodies! The turkey! The stuffing (who cares if I like Stove Top)! The side dishes! And the pies! Oh, the pies!


For my extended family holidays, my parents always host Thanksgiving. Which meant the weekend before and week of Thanksgiving was a flurry of cleaning and preparations. Most years, the apple and pumpkin pies were made from scratch (minus the crust). If my Mom ran out of time and bought pies from the store, we were sorely disappointed.


First, because homemade pies are superior.


And second, so we could sneak some of the cinnamon sugar apples. My Mom always made extra apples for the filling knowing a portion of them would never make it into the pie.


Which is why this recipe calls for heaps of apples. A few slices go to "quality control" and a few more are snacked on by John and me.


I may have cut a few corners by using Pillsbury pie crust, but nobody was complaining.


And the pie still looks homemade because I haven't mastered my crust fluting skills yet.


Plus, it's what's inside that really counts :)

Mom's Apple Pie
Note: See my Mom's extra tips in the comments.

Crust (for a 9.5 inch 2-crust pie)
I cheated and used Pillsbury. A box of 2 rolled pastry crusts can be found in the cooler near the cans of cresent rolls and biscuits. I don't like using the crust that already comes in the pan.

If you have more time on your hands, you can use Joy the Baker's or Smitten Kitchen's recipes.

Apple Pie Filling
1 cup sugar
1/3 cup all-purpose flour
1 1/2 teaspoons nutmeg
2 teaspoons cinnamon
9 to 12 cups of thinly sliced pared tart apples* (McIntosh, Golden Delicious, Jonathan, Honeycrisp, etc.)
3 tablespoons butter, cut into small cubes

Directions
Preheat oven to 425*.

Prepare the crust (or just roll it out from the box). I like to use a glass pie pan.

Stir together the sugar, flour, nutmeg, and cinnamon. Mix well with the apples, trying not to snack on too many of them ;)

Pour the apples into the pie crust and dot with the cubes of butter.

Cover the apples with the top crust. Seal and flute the edges of the crust. And cut 3 or so slits into the top.

Cover the edge with a 2- to 3- inch strip of aluminum foil to prevent excessive browning; removing the foil during the last 15 minutes of baking.

Bake 40 to 50 minutes or until crust is brown and juice begins to bubble through slits in the crust. Place the pie pan on a cookie sheet while baking to catch any drips.

* - One pound of apples equals 3 medium apples or 3 cups sliced apples

Pin It

Thursday, October 11, 2012

Falling for Frye

Gold dinosaur earrings from huiyitan, Olive metallic leather tote from Gift Shop Brooklyn,
Frye Paige tall riding boots, J. Crew Nili Lotan open cable sweater, J. Crew toothpick ankle cords

Hi, there! I'm keeping things on the short and sweet side because it's Friday!

Remember how I talked about getting new brown leather boots? I finally took a trip to Nordstrom to try a few pairs on. Either I have funny-shaped calves and ankles or I'm picky! Yes, my calves are muscular from running, so it's probably a little bit of both.

Of the boots I tried on, Frye's Paige looked the best, but they didn't have the dark brown in stores. So I'm patiently waiting for the boots to be delivered. We'll see if Paige gets to stick around or if I send her packing!

Have a great weekend!


Pin It

Thursday, September 27, 2012

Fall Style Inspiration

Every so often (OK...more often than I'd like to admit) I stare into my closet and wonder what I'm going to wear. While it's tempting to high-tail it to the nearest shopping mecca, sometimes I just need a little inspiration and help styling an item in a fresh, new way.

For example, I have a camel blazer that I know I can wear this season (and then some). I'm just a little....lost. Enter my BFF Pinterest. After a few minutes of browsing, I found these lovelies:

Top: (L), (R)
Bottom: (L), (R) 

The best part about these outfits is that I already have most everything in my closet! Camel blazer, black shirt or striped shirt, an inordinate number of scaves, and jeans. Here's my Friday's Fancies version:

Ann Taylor scarf (minus the beads), Gap Supersoft wide-stripe crew, TOMS taupe suede desert wedges,
J. Crew schoolboy blazer, Gap 1969 jeggings

Maybe if I go for it and wear the outfit in real life, I'll share it here :)

How do you breathe new styling life into your clothes?

Have a fantastic weekend!


Pin It

Thursday, September 13, 2012

A Fall Splurge: Brown Leather Boots

Melissa Button: Dark Brown, Cognac
Melissa Trapunto: Saddle Leather, Cognac Medium
Paige Tall Riding: Dark Brown Brush Off, Cognac
 
Happy Friday! It's been a busy week, so I can't wait to kick back this weekend. Exciting things are brewing, which I'll share on the blog in due time.
 
It's also starting to feel more like Fall in Chicago, which means I'm craving all things pumpkin and a pair of brown leather boots. I've been looking for the perfect pair of boots for a while and might splurge on some Frye's. Based on my experience with off-brand vs. Hunter wellies (hint: I love my Hunters), I'd rather buy a quality pair of boots that will last for years.
 
At first I was leaning towards the Melissa Button, but then I met her sister Melissa Trapunto and her cousin Paige. Now I'm torn. I tried on a pair of Melissa Button's last winter, but didn't pull the trigger because they didn't have my size in the color I wanted (of course). I'm kind of picky about things (read: I rarely order clothes or shoes online) so I plan on trying on some boots at Nordstom. That way I can check out the color of the leather and the boot's construction in person instead of ordering them online and possibly having to deal with returns.
 
Do you own a pair of Frye's? Or do you have a favorite pair of brown leather boots you'd like to share?  
 
Thanks for reading along this weekend and for leaving your wonderful comments. Have a fantastic weekend!


Pin It

Tuesday, October 18, 2011

Spiced Apple and Cranberry Cobbler

[Welcome to any new readers from The Rest is Still Unwritten! Or if you're a Fiscally Chic regular looking for a double dose, I wrote a Paris-themed guest post for Stephanie while they're enjoying Paris and France.]

As you may remember from a few weeks ago, (mostly) John and I brewed our first batch of pumpkin ale. We decided to use some specialty grains (crushed malted barley) at the beginning of the brewing process to give the beer a more complex flavor. However, that meant we were left with about 6 cups of spent grain. Not wanting to put a good thing to waste, we decided to save it.


This isn't a random hippie idea because we've been to brewpubs where spent grain is used in cooking or baking, like the Brewer's Barley Pretzels at Great Lakes Brewing Company. Great Lakes will also use their spent grain as fertilizer, animal feed, or compost. Since it's a little late in the growing season, and we don't have any livestock, baking was the way to go.

The stars must have aligned because the September/October 2011 issue of Draft magazine had a story featuring several recipes using spent grain. Additionally, Etsy had a blurb about the Brooklyn Brew Shop. Lucky for me, their website includes a nice collection of spent grain recipes.


Now, I generally don't bake just for the sake of baking. I enjoy baking when I know it will be enjoyed by others. That means I bake when people are coming over, we're going somewhere, or there's a special event like a birthday. We were having friends over for dinner on Friday night, so it was the perfect opportunity to try out a new recipe. I guess that's another thing you need to know; if you're coming for dinner, I'll probably be trying out at least one new recipe on you :)

The great thing about cooking or baking is you can improvise a little and customize the recipe to your tastes. We had all sorts of apples and a random bag of cranberries on hand, which were excellent building blocks for this cobbler. I recommend trying out other combinations of fruit based on what's in season. Maybe peaches or blueberries in the summer. And don't worry if you don't have any spent grain lying around, oatmeal should work wonderfully.


Spiced Apple and Cranberry Cobbler with Spent Grain
Adapted from a recipe by Carolyn Tesini, published in the Sept/Oct 2011 issue of Draft magazine

Serves: 8 to 10

Ingredients:

Streusel Topping
½ cup (1 stick) unsalted butter
1/3 cup all-purpose flour
2 tablespoons lightly packed brown sugar
½ cup toasted sliced almonds
1 to 1-1/2 teaspoons ground ginger
pinch of salt

Filling
4 large apples, peeled, cored and sliced (I used 2 Fuji and 2 Honeycrisp)
1 cup fresh cranberries (probably could have increased to 2 cups)
½ cup apple cider
1 tablespoon bourbon (optional)
1 cup lightly packed brown sugar
1 heaping teaspoon ground cinnamon
pinch of nutmeg
1 teaspoon vanilla extract
pinch of salt

Cobbler
1½ cups all-purpose flour
½ cup lightly packed brown sugar
1½ teaspoons baking powder
¼ teaspoon salt
¼ teaspoon baking soda
1½ cups low-fat milk
1 cup spent grain (this should be fairly dry)

Directions

Preheat oven to 400 degrees.


Streusel topping:
Melt the butter in the microwave. About 30 seconds.

Combine the flour, sugar, almonds, ginger and salt in a small bowl. Drizzle 3 tablespoons of the melted butter on top and stir. Set aside.


Filling
Combine the apples, cranberries, apple cider, bourbon, 1 cup brown sugar, cinnamon, and nutmeg in a large saucepan.

Bring to a boil, then reduce heat to a simmer and cook 10 minutes.

Stir in the vanilla and salt.


Cobbler (and putting it all together)
Whisk the flour, sugar, baking powder, salt and baking soda in a large bowl.

Whisk in the milk until combined, then stir in the spent grain.

Pour remaining melted butter in a 9x13 inch baking dish or other 3-quart baking dish.

Pour the spent grain cobbler mixture on top of the melted butter in the baking dish.

Spoon the fruit mixture on top and sprinkle with streusel.

Bake until golden brown, about 45 minutes.

Let cool at least 20 minutes before serving.
Pin It

Friday, October 14, 2011

Sewing Curtains with a Hidden Tab Top

Anthropologie earrings and dress, Kate Spade Westward Ingenue clutch, Bandolino booties

Hurray for Friday! I've had a crazy exciting week and can't wait for the weekend. This week's Friday's Fancies centers on fall colors. I decided to cheat and make my outfit a combination of fall and my curtain fabric. And I decided to subtly pick up the diamonds in the fabric.

Premier Prints Annie, Corn Yellow/Kelp Linen

Now on to the show! After looking at different styles of curtains, I decided to go with hidden tabs on the top. That style (vs. a pole-pocket top) looks cleaner to me. Plus, it's not as fussy as pleats.


Sewing curtains wasn't as hard as I thought it would be. The hardest part was taking the measurements and calculating everything.  I even drew a mock-up to make sure I wasn't missing anything. I love this stuff.


First, hang the curtain rod to figure out how long the curtains need to be. Our curtains would need to be 94 inches from the curtain rod to the floor.

To figure out the tab top, I used our Ikea Vivan curtains and this tutorial as a guide. For the actual tabs, the tutorial used heavy grosgrain ribbon. Sturdy and less sewing....perfect! I pulled out some extra ribbon (yes, it's from wedding gifts from three years ago). John kept trying to throw it out, but I knew it would come in handy at some point!

The tabs on the Ikea curtains are 2.5 inches wide, the same width as the ribbon. The curtain panels are about the same width as my fabric. Ikea has 8 tabs at about 5 inches apart. My curtains would have 8 tabs at about 5 inches apart. The tabs were 3 inches long. So I cut 16 4-inch pieces of ribbon (3 inches, plus a 1/2 inch on each end to be ironed under). Easy breezy.


Also, the Ikea curtains have 1 inch of fabric above the tabs and where the curtains will hang. That meant I needed 4.5 inches more for the top (1/2 inch ironed under and 4 inches for a wide hem at the top). 

I cut 2 105-inch panels of fabric. That's 4.5 inches for the top, 94 inches for the actual panel, and 6.5 inches for the bottom. I gave myself plenty of wiggle room since I wanted to make sure the top of the yellow diamond was at the top of my curtain panel. Plus, I wasn't sure how wide I wanted the hem to be at the bottom.

Since these were going to be curtain panels, I just used the width of the fabric (56" wide - that is 54 usable inches - not including the selvage). I needed 1 inch on each side of the panel (1/2 inch folded and ironed and one more 1/2 inch folded and ironed for the hem). I didn't cut the sides because the selvage would be hidden in the hem.


Now that I had my fabric cut, it was time get my iron and sewing machine on. I folded and ironed under a 1/2 inch on each side of the ribbon tab.

Then I folded and ironed 1/2 inch on each side of the length of the fabric. Then I folded over and ironed another 1/2 inch on each side of the length of the fabric. Now the raw edge of the fabric was neatly tucked inside my 1/2 inch hem.


The crisp seams meant I didn't have to pin the hem and could go straight to the sewing machine. Sew the 1/2 inch hem on each side of the length of the curtain panel.


Now that the sides were complete, it was time to tackle the top of the curtain. I folded under and ironed a 1/2 inch. Then I folded over and ironed 4 inches so the back would have a clean finish. This also created a pocket if I ever wanted to go the pole-pocket route.


Time for the tabs! I tucked the bottom fold of the ribbon underneath the folded fabric. Then I pinned down each side of the ribbon tab. This created little "belt loops" for the curtain rod to slide through. After the tabs were pinned about 5 inches apart, I took everything over to the sewing machine.


This is a better view where you can see the bottom fold of the tab tucked under the fabric. I sewed the bottom part of the tab and hem first. Then I sewed the top part of the tab, making sure I had my 1 inch hem at the top.


Here's the back of the curtain with the completed tabs!


And here is the final product! Yes, I still need to finish the bottom hem.


Here's another view of the curtains with our extra long curtain rod. It's actually two Ikea Beskada 38 - 152" curtain rods. With the wider rod in the middle and two skinny rods slid into each end.

Final cost
Fabric               $96
2 curtain rods    $22
Thread                $1
Ribbon         FREE!
Total              $119   

Not too shabby for custom curtain panels and the rods. A single panel from West Elm is about $44, so two panels would be about $96, including tax.

I love the curtains (John too!) and they definitely bring a little flair to the mostly brown and beige space. We have light beige walls, beige carpet, the brown leather couch, and brown furniture. Now it's time to add a little more color to the room and figure out the seating/coversation zones. Oh, and tackle the clutter and (my) dumping zones. We may also add another layer of curtains or something to cut the glare on the TV when it's bright outside.


Hope you have a fantastic fall weekend!


Pin It
Related Posts Plugin for WordPress, Blogger...