Showing posts with label house. Show all posts

Thursday, April 25, 2013

Saving Money for a Rainy Day


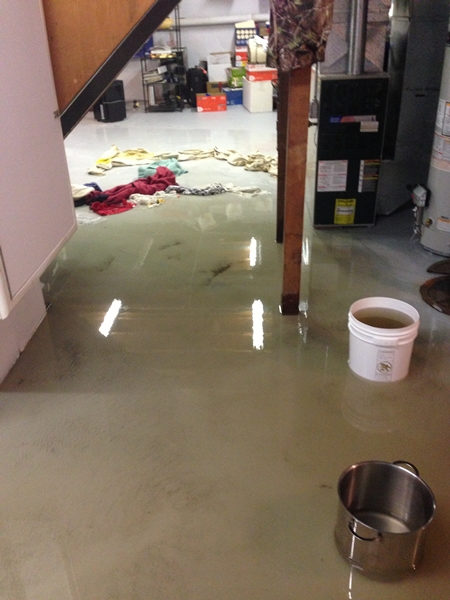
Who knew we'd be taking the phrase literally? The past week has been quite eventful thanks to torrential downpours in Chicago. Last Thursday morning, John woke up at 3am and heard some strange noises coming from the basement. Turns out a pipe for our sump pump burst and water was spraying out of the drainage well and all over the basement. And since the sump pumps connected to that pipe were compromised, water started pooling on the basement floor.

John yelled upstairs to wake me up. I began calling plumbers at 3:30am while he tried to stop the leak. I left several voicemails and finally talked with someone at 3:45am who could be at our house in 10 or 15 minutes, but not before talking with a plumber that said he could be there at 6 or 6:30am. And no, he wasn't servicing anyone at the time. Dude, if you're answering the phone and not working, why can't you come to our house? 

About 15 minutes and $150 later, we had a fixed sump pump pipe. Unfortunately, the inflow of water was still too much for our sump pumps. At its worst, the water was about ankle-deep. We were bailing water into 45 gallon storage tubs and tried our best to keep the flooding out of the finished part of our basement with towels. At one point, we had 4 of the tubs and our slop sink full of water. That's about 200 gallons of water!
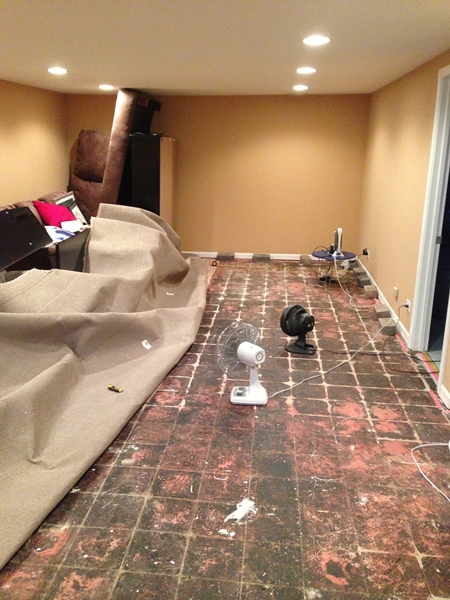

Eventually the water reached the carpet. Once the water level receded, we naively thought we could buy a wet/dry shop vac from Ace Hardware, Home Depot, Target, Menard's, or anywhere else on such short notice! Thankfully, a neighbor (without water in their basement) lent us one. 

In addition to the shop vac, we had two fans and our dehumidifier running to dry out the basement. We (Yes, I helped do all of this while 34 weeks pregnant. No I didn't go into pre-term labor) also pulled up the carpet that morning and threw out the soggy carpet padding. Thanks to our quick work, we were able to save the carpet itself and later replaced the carpet padding.

As for the unfinished part of the basement, John mopped the floor a few times with antibacterial liquid cleaner. He also sprayed the affected area with liquid bleach. Even though the fans were running and the windows were open, I made sure to stay out of the basement.

All in all, the only thing we lost was a box of textbooks John used to study for an insurance designation. John's fortuitous trip to the bathroom in the middle of the night definitely saved us. Plus, most of the stuff near the sump pump was in the giant plastic storage containers. John joked that a flooded basement is like a homeowners' right of passage. I hope we never have this problem again, but we'll probably get a wet/dry shop vac and a few more shelves and plastic storage bins just to be sure. And now we know which plumber to call in an emergency.
Pin It

Wednesday, January 16, 2013

Thoughts from an Estate Sale


We picked up an amazing dresser from an estate sale this past weekend. It's solid wood, has great lines, is in excellent condition, and only set us back $50. I couldn't find something like this on Craigslist if I tried.

Obviously such a steal is a win for us and buying something used is a win for the environment. But that isn't the point of this post.

The biggest thing that struck me from this estate sale is how much stuff this person had in their house. Additionally, John and I have both lost grandparents over the past few years and have heard stories from family members about sorting through the many belongings left behind.

Seeing a house full of stuff inspired me to take a harder look at all the stuff in our house. While I try to do my best about donating or recycling something I don't need anymore, I sometimes hold back thinking I'll need that item in the future. Plus, I feel guilty about sending something to a landfill. Though I realize that doing so turns my home into a landfill. Fortunately, Jess has all sorts of resources about making under or doing a "Throw Out 50 (or 100) Things" challenge. And by "throw out," ideally that means donating or recycling before throwing out.

To help guide the challenge, Jess uses "The Ventilator Test" to evaluate what to do with the stuff. The basic premise is:
If I was suddenly killed, moved to Timbuktu, or put into the Witness Protection Program at a moment’s notice; what would my family do with my stuff? Would they donate it to a charity? Send it to the recycling center? Sell it on Ebay? Or put it in the dumpster? If the answer is the latter, it’s safe to say that if you don’t throw away that really old prom shoe, someone else will.
Seeing and hearing about "The Ventilator Test" in action is eye-opening. Family members have enough burdens when a loved ones passes away. Cleaning out a house full of stuff from the past 50 years shouldn't be one of them.

I won't become a minimalist overnight, but I'd like to do a better job at exfoliating the unnecessary things I have and minimizing the unnecessary things I bring into our home. And it looks like I'm on the right track because I was driving to Goodwill to donate a bag of stuff and the mall to return a sweater when I stumbled upon the estate sale.

Do you have any tips to share when purging the stuff in your home? Or getting over the guilt of sending something to a landfill?

Pin It

Wednesday, January 9, 2013

Hiding TV Cords and Cables

Hi there! How was your weekend? (Sure, it's Wednesday and almost time for the next weekend!) Mine was a bit on the DIY-heavy side. I had my first foray into dress-making. Sewing one for myself and a mini one for a friend with a baby girl on the way. No previews on either dress yet because I still need to tweak my dress and I don't want to spoil the surprise for my friend.

And let's not forget our upholstered ottoman! After months of on-and-off work, it's finally done! I'm putting together a comprehensive tutorial, so in the meantime, how about a quick DIY project we completed on New Year's Day?


Back in the fall, we bought a wall-mounted TV for our back room. We successfully mounted it to the wall, but were left with some pretty ugly cables. The big box electronics stores had some products that would mask the cords, but I wanted them completely gone.

WallBlade by Sewell, Recessed Wall Plate Cable Drop With Power

After some searching online, we found the Sewell Direct Wall Blade. In essence, it's an outlet that's hidden behind your TV with space for additional cables to be fed behind the wall. It's wired to another "outlet" at the bottom which allows you to connect to an existing power source.


The tutorial didn't seem too daunting, so we put the Wall Blade on our Christmas list. Yes, we lived with the ugly cables for several months.


Here's an "in process" before shot. We checked for our wall studs using my favorite tool, the stud finder ;) Once we located the studs, we marked out where the wall boxes would be installed.


Once John cut out the holes for the Wall Blade, we found a little surprise:


We knew the back room was added on at a later date, so it was fun to see the exterior walls. What we didn't expect was that the brick was painted white. My guess is that they kept the brick wall when the back room was added, but then covered it with drywall when getting the house ready to sell.

Like the old Tootsie Roll commercial, "...the world may never know."


Back to the matter at hand. Here's how things were shaping up once we installed the Wall Blade. This picture is missing one of the cords, but we easily added it later.


And here's the final picture! Though it looks like we traded TV cables for a little extra clutter. Just keeping it real for the Internets :)

Have a great week!

Pin It

Monday, September 17, 2012

IKEA Vittsjo Entry Table Hack

 
Do you have a room in your house or apartment that's really easy to decorate? That's our front room. In the past few weeks, I bought a few things for the back room that have wound up in the front room. First was this mirror (thanks to MintLife). Most recently was our entry table.

Thankfully, this little beauty is an easy IKEA hack. Which means I'm going to "make" another for the back room :)

Supplies
IKEA Vittsjo laptop table - $39
1/4 in. thick wood (I used oak hardwood plywood) - $27 for 4' x 8' board
Sandpaper in assorted grits - $5
Extra fine sanding sponge (~220 grit) - $3
Tack cloth - $3 for a 3-pack
Minwax Polycrylic protective spray finish in clear satin - $9

The table originally came with a glass top, which I replaced with wood. Since we have a meager collection of power tools, one of the helpful men at Home Depot cut the board to size (38" x12.75").

Sand the edges: I used the assorted sandpapers to smooth the edges and ensure a snug fit on the table top. I started with the roughest grit in the pack (60), moving to a finer grit (100 then 150) as the edges became smoother.

 
Once the edges of your boards are as smooth as a baby's bottom, it's time to tackle the top. Since I liked the grain and color of the natural wood, I only needed to seal the surface. You can always stain the wood a darker color.

 
Prepare the surface: Grab your extra fine sanding block and lightly sand the surface; making sure to sand with the grain. Looking at the picture above, that would be sanding left to right.
 
Then wipe the surface with the tack cloth. It's a soft, slightly sticky cloth that picks up all the dust and sanding residue from the wood. This is critical because you want a clean surface for your stain, spray paint, or poly.

 
Spraying/sealing: Holding the spray can vertically (about 12 inches from the wood), spray a thin coat in an even, sweeping motion with slightly overlapping strokes. Following the instructions on the can, I waited for the poly to dry between each coat (about 25 to 30 minutes). I also lightly sanded the surface with the sanding sponge and cleaned with the tack cloth before spraying the next coat. In total I applied 3 coats.

 
And if you're wondering, here's how the entry table looked in the back room before we snagged it for the front room. The Lively's were over on Saturday for dinner and helped us do a little furniture rearranging.

 
Lookin' good, if you ask me!
 
 
Yea, I like you here too :)
 

Pin It

Tuesday, August 28, 2012

Decorating around Mother Nature


I had all sorts of grand ambitions for the back room this past weekend. On Friday, I stopped by Ace Hardware after shipping my 103rd (!) Etsy sale for three more cans of yellow spray paint. And yes, the same cashier was there from when I bought my first two cans of yellow spray paint. She probably thinks I'm an addict. Little did she know what else I wound up buying over the weekend.

The initial plan was to spray paint the tall shelving unit (and hopefully not my feet). Unfortunately, Mother Nature had other plans. As in humid 90+ degree weather, which doesn't mix well with spray paint. The Rust-oleum can recommends painting when the temperature is between 50* and 90* and when humidity is below 65% to ensure proper drying. Throw in some rain on Sunday and I failed the weather-test all three days.


Since I was still looking to make some forward progress, I headed to Home Depot (twice) on Sunday for more materials:
  • A 4' x 8' piece of oak hardwood plywood at 1/4" thick - cut to size for shelves and the table top - $27
  • Two cans of BIN by Zinsser primer spray paint - $17
  • Polycrylic water based protective finish in clear satin - $9
  • Assorted sanding paper and sponge - $8
  • Tack cloth - $3

 
The Vittsjo series comes with a mix of 1/4" thick tempered glass shelves and 1/2" thick laminate/particleboard shelves. The TV unit originally came with a glass top and the dark laminate/ particleboard for the bottom shelf.
 
The original plan was to swap out the glass for the 1/4" thick plywood that would be primed and painted yellow. Since the 1/4" wood doesn't seem sturdy enough for our TV, we're going to make the 1/2" IKEA-provided shelf the top shelf. Sure, it will stick out a little past the frame, but it will give us more peace of mind. Both will be getting a coat of BIN primer (as recommended here) and then spray painted yellow. 

 
Here's the tall Vittsjo shelving unit with its new wood shelves and IKEA laminate/particleboard shelves. Once the tower itself is painted yellow, the shelves will also get the primer and yellow spray paint treatment. We don't plan on putting extremely heavy items on the middle shelves, so I'm not too worried about them breaking. I tested some of the 1/4" wood shelves with a stack of 4 cookbooks and they seemed to be holding up fine.
 

As for the entry table, I initially thought I would stain and then seal the wood. But after picking out the oak hardwood plywood, I'm happy with the wood grain and color of the natural wood. Therefore, I selected the Polycrylic crystal clear satin topcoat to seal the wood.
 
All of the edges of the wood shelves and tabletop need a good sanding so they fit perfectly in the Vittsjo pieces.
 
Overall, it feels like things are starting to come together, but it's still uncharted DIY territory for me. I've been reading all sorts of things to make sure I've picked up the right supplies and have a general idea what I'm doing. I definitely feel my brain stretching through the creative process :)

Pin It

Tuesday, August 21, 2012

I'm Back for More!

Ready for a photo-heavy post? You better be because it's too late to change things now!

In addition to some family and friend time, this weekend was mostly devoted to the back room. I've pinned all sorts of ideas to my back room board, so it was time to see things in person before making an ultimate decision and purchase.


Friday afternoon was spent at garage sales, Goodwill, World Market, and West Elm. My main goal was to check out side tables. I was really looking forward to seeing West Elm's round bone side table. We have a lot of 90* angles in the back room, so I was looking for something round to balance all the squares and rectangles. I really like the top of the table, but the bottom might be a little too matchy-matchy with some of our other pieces. Boo.


Then I stumbled upon this lovely number. I love the curvy and airy, yet left-brained nature of the foxed mirror side table, but am a little hesitant with the mirrored top. I don't know how kiddie-friendly it would be down the line. In discussing with John later in the weekend, we might actually go for something softer, like an ottoman. The jury is still out whether it would be purchased or DIY-ed.


My West-Elm-spending-strategy (thanks to MintLife!) might also change after seeing this bone inlay Parsons mirror. I know we're decorating the back room, but I think it might be a perfect fit for the bathroom. Then the extra funds can be used for accessorizing. Or I might change my mind tomorrow :)


Saturday was spent at America's favorite Swedish amusement park superstore...Ikea! Who wants Six Flags when Ikea has eight flags!


I had a better idea of what I was looking to purchase at Ikea: an Expedit bookshelf and Vittsjo tableTV unit, and shelving unit. All of those, plus a white planter, cost about $220 plus tax. 


Back home, I went to work assembling and getting my spray paint on. I followed the advice of Centsational Girl's tutorial and used Rust-oleum spray paint in glossy yellow (about $10 for 2 cans). One of the commenters had used a different brand of spray paint and everything was flaking off. I'm happy to report that Rust-oleum worked wonderfully for me and I didn't need to use a primer.


So what was getting the facelift? The Vittsjo TV unit and shelves. Kate also said in the comments that she assembled the shelving unit before painting. It didn't seem very windy, but it was a pain.in.the.butt to spray paint those tiny bars!


I used two cans of spray paint just for the TV unit! I think half of the paint ended up on the drop cloth, blown away, or on my feet. And as a note for next time, it'll make life easier to spray paint on the grass.


Here's a preview of things to come with the TV unit and shelving. These came with glass and particleboard shelves that will be replaced with solid shelves painted yellow. Obviously I need to purchase some wood to replace the glass, but I've now considered spray painting the particleboard after reading these tips.


As for the rest of my haul, the Vittsjo table is going to be our new entry table. It also came with glass that I'll be replacing with wood. I'm thinking of a lighter stain. Of course I'll keep you posted.


Last, but not least is the Expedit shelf. I'm following Maggie's lead and making it into a bench. I've found some additional tutorials for creating an upholstered cushion that's attached to the Expedit unit. Though we have a little time for that ultimate decision because I haven't even thought of fabric yet!

What's new with you? Tackle any projects recently?


Pin It

Friday, August 10, 2012

Back Room Design Ideas


Earlier this week, you might have noticed a post with just pictures of our backroom. While I occasionally accidentally publish posts before they're ready, this time was intentional because I needed a fast way to share pictures of the room.

Why? Because I recently won a giveaway on Mint's blog for $400 to West Elm and a 1-hour consultation with designer Tracy Hutson of Extreme Makeover: Home Edition fame! We had our phone call earlier this week and had some technical difficulties while emailing the pictures. So a quick blog post was the way to go.

It was super fun chatting with Tracy and she had some great ideas for the room. First, she agreed that we needed an entry table to drop off keys, cell phones, wallets, etc. And a proper place to kick off our shoes. Right now, the area of the left of the door is a mess. I'm envisioning something like this:

Pinned Image
From House and Home
Pinned Image
From The Everygirl

A console table to the left of the door with space below it for shoes. A white Parsons desk or table might be a good option, or maybe something a little less modern.


The entertainment unit is a little small for the room, so we're looking into getting something new to be the focal point of the room. There are some incredible vintage credenzas on Craigslist, which are perfect for our 1950's home.

From Jess Lively

In addition to suggesting a low console, Tracy suggested leaning some larger artwork against the wall behind the TV. Jess's living room is a great example of that, though we wouldn't have the bookshelves on the side. Tracy also suggested adding a floor lamp off to the side of the TV.


As for the area by the window and couch, Tracy recommended pulling the couch slightly off the window. We've already moved the couch and I think it makes the room much cozier.

Rustic Storage Side Table 
West Elm rustic side table
Bone Side Table
West Elm bone side table

We could put a console behind the couch, add side tables, or add a coffee table/ottoman. John is more game for side tables, so we'll probably look into those.


As for this nook on the side of the couch near the bathroom, Tracy recommended making a little seating area or adding a low bookshelf that can also work as seating.

Pinned Image
From Maggie Rose Interiors

Maggie's low bookshelf immediately came to mind, so we'll probably be making a trip to Ikea soon to pick up an Expedit shelf!

Clearly this room will evolve as we shop and find new pieces, but it's nice to have a jumping off point with some outside help. Plus, there will be accessories to find once we get the big pieces :)

Have you redecorated any rooms recently?

Pin It

Tuesday, July 31, 2012

A Case of the Mondays

Monday. Yes, I know that was yesterday, but I didn't have it in me to get a post ready to go. Some Mondays are relatively painless, while others just kick. my. butt. And that was yesterday. It didn't help that we had a super-fantastic weekend!


As of Friday, the patio was 95% complete. And as of Monday night, it was done! You know a big photo dump is around the corner ;)

Which was perfect timing because we had friends visiting from St. Louis. The patio got a workout with dinner at the table, chatting around our firepit, and enjoying coffee Sunday morning.

Friends! Our friend on the far right perfected "Think of the Savings."

Plus, the Cubs were playing the Cardinals, so we took a field trip to Wrigley Field. It was my first time at a Cubs game and now I can see why people are such Cubs fans. We may have sat 3 rows from the top, but it felt much closer. And I think Wrigley is pretty "cute" with all of its historic charm. Though I didn't get the full experience because I passed on the Old Style.

I could continue on about what exactly we did and where we ate and whatnot, but my biggest takeaway from the weekend was how much fun I had spending time with friends. Which got me to thinking that I really need to work on keeping in touch with friends from home and college. Sure, I can see what's going on via Facebook, but it's not the same as a phone call or in-person chat.

How do you keep up with friends spread about the country or even the world?
Pin It

Friday, July 20, 2012

Let there be Gravel!

I went with the Shabby Apple navy striped skirt. Thanks for the feedback!

To be honest, I don't have it in me to create a fab Friday's Fancies post. My mental energy has been channeled at work and whatever I have left is put into the patio.

Work started on Tuesday, but we've hit a few hurdles with a delivery delay and rain. Oh, the rain! I know we need it in Chicago, but why now? And of course the storms were at night, so I didn't sleep very well. On Thursday morning, our patio hole was looking like a swimming hole!


So instead of filling in the hole with gravel, they were pumping out water and removing part of the driveway.


Fortunately, our permeable pavers were delivered!


And they were able to remove part of the driveway.


We also we went ahead and ordered our patio table and chairs! Yes, they're from Walmart, but the set met all off our requirements:
  • A table for 6
  • A metal tabletop
  • 2 swivel bouncy chairs
  • Under $1,000

The patio set also had really, really good reviews. One lady even left a review 2 years later saying how well it's held up.


In other good news, they're filling the hole with gravel as I type!

Hope you have a fantastic weekend!
Pin It
Related Posts Plugin for WordPress, Blogger...