

Last week I tweeted and shared on Instagram that the nursery is still in process. A few parents responded that their nurseries are still in process (even after a year!) or that their nursery wasn't quite ready when the baby arrived. While this made me feel a little better, I still wanted to make some progress beyond the crib and dresser. Last weekend's party and a Pinterest Challenge were just the motivation I needed!
 |
| Top: Nursery from My Life in Transition Left: Tissue paper pom mobile from PomLove on Etsy Right: Nursery from Under the Sycamore |
After a flurry of pinning, I decided that the nursery needed some fluffing. Mainly some pom poms and lanterns above the crib a la Julia of My Life in Transition. Her daughter's nursery is perfectly girly, but not too over the top. And let's not forget this lovely collection of fluff above Ashley Ann's DIY pallet day bed.

I had everything I needed from prior craft projects or in my gift wrapping stash. That stack of tissue paper is just from baby showers!

Materials
Note: This is for one pom pom. Scale up the quantity of materials as needed.
- 4 to 6 sheets of tissue paper. (Mine were about 20 x 26 inches)
- Floral stem wire (20- or 24-gauge)
- Scissors
- Hooks for hanging the poms
- Fishing line or string to hang the poms
Fold your sheets of tissue paper in half (like a hot dog) and cut them in half. This will leave you with a stack of 8 to 12 sheets of tissue paper (~10 x 26 inches).

Make 1 to 1 1/2-inchwide accordion folds, depending on how dense or fluffy you want your pom to be. Mine were probably closer to 1 inch folds. Be sure to crease after each fold.

Pinch the folded stack of tissue paper in the middle.
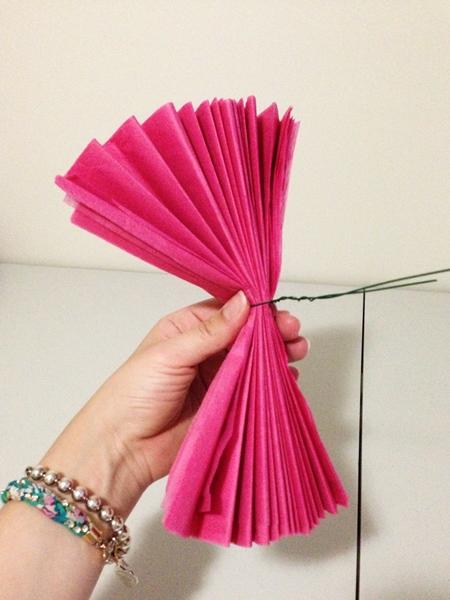
Wrap the floral wire around the middle of the stack of tissue paper, making sure to twist the wire around itself.

Trim the ends of the tissue paper into pointy or rounded shapes.

Separate and fluff the layers one at a time. (See also Step 3's photo from Martha Stewart's tutorial.) I alternated which side I pulled away from the center so that my pom pom was evenly fluffed.

Give your pom pom a once over and proper fluffing.
At this point, I trimmed the floral wire down a bit and bent it into a loop. Cut the fishing line or thread to your desired length and loop around the wire loop.

In addition to the DIY poms, I picked up a package of pink accordion lanterns from Michaels. They were about $10 after a 40% off coupon and super easy to unfold. String is not included in the package, so you'll need to cut additional fishing line or thread to your desired length and loop it around the wire loop at the top of the lantern.

We used these hooks from a picture hanging kit to hang our poms and lanterns. You could also pick up some J-hooks from the hardware store. Since the lanterns and poms are extremely light, we didn't bother with anchors.

John found that hammering the hook halfway into the ceiling and then screwing it in was the most effective. He then tied the fishing line, which was already looped around the pom or lantern, to the hook. We just eye-balled the placement of the poms and lanterns, making sure to vary the sizes, colors, and heights.

I still need to pick out artwork and some shelves for the nursery, but at least things are moving along!
Pin It
Stopping over from YHL.
ReplyDeleteThe pom poms are great! I've yet to do much with Susanna's room as she shares it (at times) with her older brother. Yet, I did make the time for a heart bookshelf for her (a 50 cent thrift store find!)-
http://www.newmomstalk.com/2013/05/08/diy-gradient-heart-bookshelf/
All the best to you.
Adorable! I know they've been done to death but I can't get over the pom pom/paper lantern trend. Yours are great!
ReplyDelete