Tuesday, June 28, 2011

Bringing in the Experts

By now, I've shared all sorts of random tidbits about our house. Unfortunately (for you) I've withheld one critical piece of information: the fabulous person who helped make our house possible. Our fantastic real estate agent, Stephanie Sullivan of Dream Town Realty.

I've come to realize that I don't have the time, talent, interest, or resources to do everything I want or need to do. Yes, we wanted to find a house, but neither John nor I had the time to tackle that, especially since I was working through my busiest time at work. We had a general idea about areas of Chicago, but lacked the in depth knowledge and network of people to ask. We could search through Craigslist, Zillow, and other real estate listings, but knew we were missing out on several great properties. Enter Stephanie, who has all of that, and then some!

Chicago Realtor - Stephanie Sullivan
Stephanie Sullivan of Dream Town

Our home buying adventures with Stephanie started almost 2 years ago. In the fall of 2009, John found out he could transfer with his current employer from St. Louis to Chicago. That started a flurry of apartment searches via Craigslist. I found the St. Louis apartment on Craigslist, so thought it would be a good starting point. Calls and emails were sent regarding interesting listings and Stephanie was one of the contacts.

Stephanie was working with a different real estate company at the time, but still had the professionalism, resources, and knowledge we were looking for. Instead of just showing us one apartment, she set us up with the MLS listing database and sent over potential properties that met our criteria (area, number of bedrooms, price, etc). We discussed the sorts of neighborhoods that appealed to us: vibrant, reasonably priced, close to amenities and public transportation, safe, among other things. Since we were new to the city of Chicago, the options were overwhelming. Stephanie helped to focus our search.

Chicago apartment search

We were going to be in Chicago for a weekend and decided to make a day of looking at apartments. The morning was spent looking on our own and the afternoon was spent looking at about 8 different places with Stephanie. At the end of the day, we found our apartment! It had everything we were looking for, but was priced a little high. Thankfully, Stephanie has excellent negotiation skills! She was able to negotiate rent down by $200 per month! Maybe it's because she was born in Texas.

All of these items made Stephanie the first (and only) person that came to mind when we were ready to start looking at houses. During the 1.5 years of living in our apartment, Stephanie started working with Dream Town and kept in contact with us. (Note to self: Keep up with networking!)

By the end of 2010, we had started to do our homework and knew we were ready to start taking the search a little more seriously. We met with Stephanie at the Dream Town office in Lincoln Square in January 2011. Even before our meeting, she had us back on the MLS listings and sent over properties based on our skeletal requirements. At the office, Stephanie explained the whole home search and buying process. We also discussed our search criteria in more detail over in-house brewed espresso.

Looking at our house

Once we found about 10 listings that were really appealing, Stephanie scheduled the showings. We saw 9 places in February 2011. (Our home was in that grouping!) We took a second tour of homes in March 2011 and saw our favorite again. At that point, we knew we wanted to make an offer on the house. And you know how the rest ended :)

It's crazy to think that we we started the search in January, made one offer in March, closed in April, and moved in May! Though it's not that crazy considering we had an expert on our team. Stephanie got to know us, our wants, and our needs. She was also able to interpret our reactions to some of the less than desirable properties we saw. Stephanie was available to walk us through the complex process of making an offer, negotiating inspection points, and hammering out the final closing documents. She skillfully answered every single question or knew who to ask. It also helped that Stephanie has her own team of experts (lender, real estate lawyer, and inspector).


John and I can't thank Stephanie enough for her help in making our dream a reality. Real estate is more than just her job, it's her passion. On the day of our closing, Stephanie gave us a gift. "We're Moving!" postcards with pictures of our new house. The personal touch made all the difference.

If you're in Chicago and looking for more advice about buying a home, Stephanie is having a Home Buying Seminar on June 30th at 7pm at Dream Town's Lincoln Square office (4553 N Lincoln Ave., Chicago, IL 60625). There's going to be free food, cocktails, and a raffle. It's a little past the RSVP deadline, but there might still be some space available.

You can find more information and reviews about Stephanie on her Dream Town page or Facebook page.

I'm not compensated to share my review of Stephanie or publicize her seminar. I just think she's a fantastic resource and excellent real estate agent. Plus, she's a prime example of knowing when to bring in an expert.

Who's an expert on your team?
Pin It

Monday, June 27, 2011

Design Tool Time

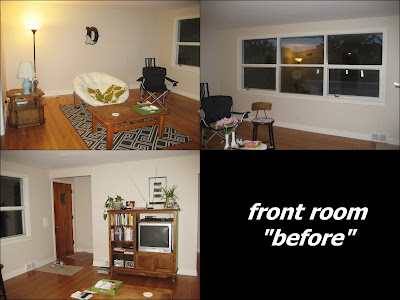
How was your weekend? We went to a party on Saturday night for a friend that's joining the seminary. And we ordered some furniture from for the front room! While we need furniture for most rooms in the house, the front room is being tackled first. Darvin was having a pre-4th of July sale, so we decided to check it out. Here is a present day "before" shot to show what we're working with:


As you can see, there's a motley crew of furniture. Our sectional sofa is in the basement, so we're left with camping chairs, a papasan, an extra kitchen chair, and the industrial vintage stool. After plenty of brainstorming, we decided to stray from the sectional sofa in Friday's design board since we didn't really see any we liked. Plus, we were having troubles visualizing the seating arrangements (more on that later). In the end, we purchased a three-butt sofa and two-butt love seat. They'll look a little something like these, but with different pillows:

Photo from Darvin
Since we're pretty much working from scratch, the multitude of options in floor plans is overwhelming. I've tried drawing floor plans, but needed something faster and a little more flexible. What if I found a couch in a different size? What if I wanted two sofas instead of a sectional?

Enter my new friend Plan Your Room. This website allows you to draw your room, add furniture, and move it around or make changes with the click of a mouse. No thinking about ratios or whether an inch equals a foot or 8 inches. After a bit of redesigning, here's what I'm thinking:


Love seat under the window, three-butt sofa on the wall, one accent chair, and a rug anchoring that zone. There will be coffee tables, side tables, and lamps scattered throughout. The chest will be on the wall where the TV is currently sitting. The TV will be moved to the back/family room. Yes, there's some open space on the left side of the room, but we need to be able to walk between the front door, kitchen, and bedrooms. And I'd like the room to have a chance to "breathe."

The sofas will be delivered in about a month, so there's plenty of time to paint or rearrange the room!

How do you design a room's floor plan? Pencil and paper? Actually moving the furniture? Or something a little more high tech?

(I wasn't compensated by Plan Your Room. This is just a fun discovery I thought I would share with you.)

Pin It

Friday, June 24, 2011

I'm Feeling (Navy) Blue

Remember my inspiration room?


We made a little forward progress this week in making that picture a reality!


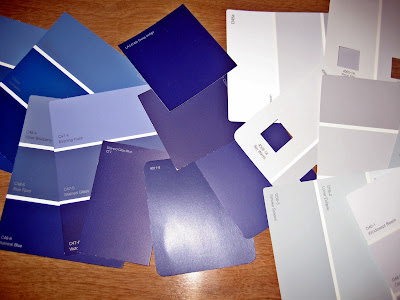
John has been wanting to get a grill for quite some time, so we pulled the trigger and bought a Weber charcoal grill at Lowes. Using our "welcome to the neighborhood" 10% discount, of course. While there, I picked up a "few" navy blue paint chips. We're also trying to decide how to paint the kitchen, so I threw a few gray ones in there too.

We also made a little progress in the furniture department. Jess sent me some before/after pictures of a living room designed by Kirsten Krason Interiors with a pretty snazzy chair.

From 6th Street Design School

This baby could be mine (or yours) for $328 from Urban Outfitters.


Or....I found its twin for $230 from Target!


We would get a pair of chairs and either have them in front of the window or float them in the middle of the room, facing the couch. I'm still not 100% sure. Is that too much blue if the walls are going to be blue? At first, John thought the pattern was too busy, but might be coming around. I'm OK with the pattern since the couch and drapes will be neutral.

Then I saw this when looking at rugs. Blue walls. White trim. Hardwood floors. Neutral rug.

West Elm

Now I'm thinking, what if the accent chairs were gray? Or maybe upholster an ottoman like that for a coffee table? We also plan on bringing in an antique trunk as a bench/side table/accent table. Of course pillows and art will add a pop of color. Here's how my inspiration board looks right now:

Paint: Benjamin Moore Champion Cobalt
Sectional sofa: West Elm
Ottoman: West Elm
Lamp: West Elm
Rug: West Elm
Planter: Home Depot (bought years ago, personal photo)
Pillows: DIY

Nothing is set in stone and some of these items are place holders. (i.e. I don't think I'll be getting everything from West Elm.) There are also more things to add to the mix: artwork (framed blueprints?), possible bookshelves, end tables, drapes, etc. Overall, I think it's a pretty good start. John talked about painting the room over 4th of July weekend.

Hope you all have a fantastic weekend. John will definitely be grilling and I'll probably be scouring Craigslist for all sorts of things. What do you have planned?

PS - This is a late addition to Friday's Fancies. Don't forget to check out the rest of the gang!


Pin It

Wednesday, June 22, 2011

Conclusion of "Think of the Savings - Cell Phone Edition"


Hi friends! Hope you're all doing well and are safe. We had a massive thunderstorm last night and the neighborhood had some damage. A tree fell down in the neighbor's backyard, bringing some utility cables with it. Their deck and addition have some major damage. Nothing happened to our house, except for a low hanging wire. It appears to be for cable since the electricity and Internet seem to be working fine. We don't pay for cable TV, so there's no way to know for sure that's what's damaged. While thinking about utilities, I thought I would wrap up "Think of the Savings - Cell Phone Edition."

When we left off, I decided to stick with a cell phone instead of upgrading to a smart phone. The plan was less expensive and I knew I wouldn't get full use of a data plan. You might also remember that I was ultimately going to have to pay $50 ($100 up front less $50 rebate) for the phone. Then I saw it for free online and was annoyed. (That was the promotional pricing at the time, the current price is now $50.)


Fortunately I totally lucked out with the Verizon customer service rep. She found a way for me to get the phone for free. At first, the plan was to deny delivery of the phone I had ordered in the store. By not accepting delivery, I would not be accepting the terms and conditions of the phone contract and avoiding a $35 restocking fee. The phone would then be returned to Verizon's warehouse. Once Verizon received the phone, my account would be updated to show that I was still eligible for a free upgrade. Then I would be able to order the phone online for FREE!

Fast forward a few days. My awesome customer service rep was able to reroute the phone back to the warehouse, saving me the hassle of denying delivery. After my account reverted to "eligible for upgrade" status, I ordered the Pantech Crux. A few days after the transaction was finalized, I confirmed that my credit card was credited for the initial charge of $100. Victory!


As for the phone itself, I'm really liking it. The touchscreen is easy to use and I like the way it stores my text message conversations. My only beef is that the battery dies quickly after the phone is connected to a computer. However, a full charge plugged into the wall fixes the problem.

Have you had any crazy weather by you lately? Anybody else have customer service stories (good or bad) they'd like to share?
Pin It

Monday, June 20, 2011

Blueberry Rhubarb Cobbler


And I'm back in the kitchen! After a short moving-imposed baking hiatus, I'm happy to say that desserts are back on the table. This blueberry rhubarb cobbler is the first "real" baked item in the new house. I made a frozen pizza a few weeks ago, but that didn't turn out very well. The oven started smoking and the smoke detector went off. After closer inspection, there were some unidentifiable black crusty things hidden underneath the grate in the oven, which caused it to smoke ...ooops. Now that we have a clean oven, I can bake all the cobblers and cakes I want!

Not pictured: baking powder
As I've said before, I'm a sucker for farmer's markets. I picked up the rhubarb the same day I bought the peonies. Strawberries are the typical first choice when using rhubarb, but there's no reason they should hold a monopoly on rhubarb. Blueberries pair just as nicely with the tart rhubarb. Plus, I already had a great recipe for peach and blueberry cobbler. Therefore, substituting rhubarb was an easy choice.


I also love the contrasting colors. Red strawberries and red rhubarb would look bland in comparison.


Blueberry Rhubarb Cobbler
Adapted from Better Homes and Gardens: Peach-a-Berry Cobbler

Filling
  • 1/4 cup packed brown sugar
  • 1 tablespoon cornstarch
  • 1/2 cup cold water
  • 2 cups sliced fresh rhubarb
  • 2 cups fresh blueberries
  • 1 tablesppon butter
  • 1 tablespoon lemon juice
For filling, in a medium saucepan stir together brown sugar and cornstarch; stir in water. Add rhubarb and blueberries. Cook and stir over medium heat until thickened and bubbly. Add the 1 tablespoon butter and the lemon juice; stir until butter melts. Pour into an ungreased 1-1/2-quart casserole. (I used an 8 x 8 inch Pyrex pan.)
While the filling is cooking, make the topping.
Topping
  • 1 cup all-purpose flour
  • 1/2 cup granulated sugar
  • 1-1/2 teaspoons baking powder
  • 1/2 cup milk
  • 1/4 cup butter, softened
  • 2 tablespoons coarse granulated sugar (or 1 tablespoon granulated sugar and 1 tablespoon brown sugar)
  • 1/4 teaspoon ground nutmeg or cinnamon (or both if you love spices like me!)
For topping, stir together flour, the 1/2 cup granulated sugar, and the baking powder. Add milk and the 1/4 cup butter all at once. Stir until smooth.


Spoon topping in mounds over hot filling; spread evenly over filling. Sprinkle with a mixture of the 2 tablespoons coarse sugar and the nutmeg and/or cinnamon.

Bake cobbler in a 350 degree F. oven about 35 minutes or until bubbly and a toothpick inserted into topper comes out clean. Serve warm with ice cream, if desired. Makes 6 servings.


Pin It

Friday, June 17, 2011

Father's Day Weekend


It's Father's Day this weekend, so we'll be spending time with John's family and telling corny jokes. And although we celebrated with my parents last weekend, I'd still like to send a virtual "Happy Father's Day" to my Dad. Thanks for waking up early to drive me to swim practice for all those years!

Jess LC clutch, J. Crew belt, Tory Burch sandals, J. Crew dress, Kate Spade hoops

We also plan to work on the house and catch up with friends. I think this outfit could work well for a Father's Day BBQ or dinner and drinks with friends. Not for weeding the garden :)

To top off the week, here are some peonies from the farmer's market. They make the house smell so good!


More importantly, it's a sneak peek of something that will probably wind up in the front room. I bought this vintage industrial chair several years ago at an antique market in Ohio. It was sitting patiently in my childhood bedroom until my parents drove it out to Chicago with the rose bushes. Now we just have to find the perfect spot for it.

Hope you have a fantastic weekend! Be sure to tell your Dad you love him too!

If you're looking for more weekend inspiration, check out the other Friday's Fancies.
Pin It

Thursday, June 16, 2011

The Reel Deal

Great news! The rose bush seems to be springing back to life! It rained for most of yesterday, which seemed to help the bush. When we got home from work, a bunch of new flowers were about to start blooming....yay!


While we're on the topic of yardwork and gardening, I thought I would get "reel" about our lawn mower. This was mostly John's decision since he has the most mowing experience and will be cutting our grass 99.9% of the time. Since our lot is less than a quarter acre (and we have the world's largest hedge), John wanted to buy a reel (manual) push lawn mower. No self-propelled or riding mower for us. Other reasons for purchasing a reel mower include:
  • Environmentally friendly - no gas fumes spewing on us or into the environment
  • Easy to maintain - the blades will only have to be sharpened every so often
  • Less expensive - won't have to spend $4+ per gallon for gas, oil, parts, or maintenance
  • Quiet - John can mow the lawn at any time since there isn't a loud motor
  • Good form of excersize - it's not very hard to push, but you do need to walk briskly to keep up the momentum

After copious amounts of research, he settled on the Scotts 20 in. Classic Reel Mower with a clippings catcher ($139). When we went to Home Depot, they were all out of the 20 in. model. The sales associate said they had been selling like hotcakes. Particularly to people in their 20's and 30's. Who knew we were so hip?

Therefore, we settled for the Scotts 18 in. Supreme Reel Mower ($109). The reviews said the grass catcher was a little annoying, so we're OK that we didn't get it. Plus, we can easily mulch the grass with the clippings.


The mower was pretty easy to assemble and John didn't need to use any tools. As you can see below, there aren't very many parts.


John is 6' 2" and the mower is a good height for him. I pushed it around the other day and the height of the handle works for me too.


Since John has used the mower for about a month, I think he can give a pretty good assessment of the mower:
  • First, it's definitely important to note that we don't have a very large lawn. It only takes John about a half hour to cut the lawn, so a reel mower is definitely a good fit for us. If you have a larger lawn, you better be ready for a good workout.
  • While you can adjust the height of the blades, the mower doesn't do very well with super tall grass or weeds. He waited about two weeks to cut the grass once and dandilions sprung up between then. The mower just pushed over the weeds, so he had to go back and pick them by hand. Or he has to mow over the area multiple times.
  • The reel mower doesn't do well with twigs at all, so you have to pick them up before mowing. If you don't, the blades will jam.
  • The mower can be a little hard to maneuver around corners, but it's easy to push.

Overall, we're totally happy with the decision to buy a reel mower! We definitely recommend it to anyone in the market for a new lawn mower.

Anyone else keepin' it real with a reel mower?

(We weren't compensated to review the lawn mower. We bought it with our own pennies and the opinions are ours.)
Pin It

Tuesday, June 14, 2011

Watching Our Garden Grow

How was your weekend? No major updates on the bathroom yet. I bought a curtain panel from Target and the to-be-hacked roller blind from Home Depot, but stopped there. Most of our efforts were concentrated on the outside instead of primping the bathroom. If you're really curious, here's how the bathroom looks with the new shower curtain:


So back to the yard. It looks a million times better thanks to the help of my parents! My Dad loves working in the yard, so I like to think we gave him an early Father's Day present for "letting" him help. Here he is transplanting a hosta from the back of the house to the front. He also moved the salvia plants over to make room for the hosta.


Before Pictures

Before I show you the rest of the fruits of our labor, how about some "before" shots? These were taken in April during the final walkthrough.


Not too much going on in the front, except for John. The small evergreen on the left is still close to that size. The tree in the middle has filled out a little and the burning bush on the right has completely exploded with greenery! There are also some salvia, black-eyed susan, and other plants that have since sprouted.


Beginnings of the hosta that eventually found its way to the front. 


We are also proud owners of the world's largest hedge. Well, maybe not, but it's definitely too big for the house. We're considering different options for this area and they all include cutting down the hedge. We might add some different bushes, like hydrangea. Or maybe we'll lay some brick for a patio area. Regardless, it will probably be a next summer project.


The backyard also has a berm, which is a raised flower bed. (Not a burial ground.) Don't worry, the weeds were evicted Memorial Day weekend. The purple flowers are Walker's Low Catmint. Just wait for the "after" pictures of the berm!

After Pictures - Front


Let's start with the front of the house again. To the right of the front door is this area. I can't remember the name of the plant in the back. They have some small pink flowers. In the middle are black-eyed susans. See how there are two larger plants on the outside of the picture and two smaller ones in the middle? The black-eyes susans were spreading towards the grass so my Dad split them in the front and transplanted them in the middle. The small pink flowers in the front are impatiens.


The area to the left is still a work in process. The bright green plant is the hosta and the purple plants on each side are salvia, which already grew in the bed. We My Dad planted some begonias down in front. Here's a little close-up:


After Pictures - Back


The biggest difference is obviously in the berm! The weeds are (mostly) gone and the catmint has been moved to the back of the mound. On the top are all sorts of herbs and veggies. Since this is our first real garden, we went all out: basil, Greek oregano, sage, tomatoes, red and green peppers, zucchini, and watermelon. Most of the plants were less than $2 each (sometimes for a little 4-pack), so we won't go broke if a few croak.


We also added some pops of color in the back with these hanging flower baskets.


One of the main purposes of the trip was to bring some rose plants from my parents' yard. My Dad planted them shortly after they arrived on Saturday and I think they're still in transplant shock. The weather has been slightly cooler and we've made a point to water them daily. We even watered with rose food on Saturday. Hopefully we'll have a successful "after" picture soon!


This pink rose bush replaced the hosta plant that was moved to the front.


Here is the climbing rose with some extra begonias.

Since we're pretty new at gardening, it's exciting to watch everything grow. Hopefully in a few months we'll have some fresh-picked veggies from our garden! How about them savings?!

Are you growing a vegetable or herb garden? Have any gardening tips to share? If your thumb isn't so green, what are your favorite fruits or vegetables to enjoy in the summer?

And a big "thank you" again to my parents for their help!

Pin It

Thursday, June 9, 2011

Let the Decorating Begin!

I could tell you about our push lawn mower or the conclusion of my cell phone saga, but it's Friday. Plus, something moved up on the priority list. My parents are visiting this weekend! They're bringing some rose plants from their yard to help our garden grow. While they don't expect the house to be put together, I think I can get one room ready on short notice. Our small second bathroom:


Since my parents might be staying with us, having the second bathroom ready will make getting ready in the morning much easier. However, it doesn't have much privacy. It's difficult to tell, but the windows are clear glass. To make it even better, the bathroom looks out to our neighbor's backyard. Here's my quick inspiration board:


We bought some brown blinds from Target two weekends ago, but they ended up being the wrong size. Plus, they're a little too dark for the room. After some thought, I'm going to attempt a custom roller blind using that purple-y Waverly fabric I bought from Joann's a while back. Design*Sponge has an excellent tutorial and it doesn't seem too difficult. Here's how it might look. The roller will be installed under the window trim.


With so much flair on the window, the shower curtain will have to be a little more subdued. Right now, I'm thinking gray to pull from one of the colors in the fabric. The gray and white striped shower curtain is from West Elm. Maybe we'll go striped or maybe we'll find one in solid gray.

To play off the global vibe of the window, I'm thinking about framing a picture from my time studying abroad in Spain. That's one of the fountains at the Alhambra in Granada. We have some extra frames lying around, so it will only cost as much as the print.

So what do you think? I'll post some post-decorating pictures after the weekend.

Anyone else have parents visiting this weekend? Or are you visiting them? We're going to celebrate an early Father's Day and I plan on baking some carrot cake cupcakes.

Pin It
Related Posts Plugin for WordPress, Blogger...